About Me

- Tonya
- Hiya I'm Tonya! I'm an avid psper, have been for a few years and finally have me a blog that I've been working on slowly getting stuff added to. I started writing tuts and recently started making masks and templates. I LOVE to see creations you've made with my things, if you'd like to email me please do so at aquaspinner@gmail.com ................................................. My TOU are as follows: All of my items are personal use only NO Commercial Use, please do not share (distribute) my stuff in groups, just send people here to grab please. ♥ Tutorial writers, if you wish to use my stuff in your tutorials, of course I am honored! You're more than welcome to use my stuff in them, I only require that you link to me and send people here to grab the goodies that you are using in the tut. ................................................. Hope you'll enjoy what I have for ya and thanks for stopping by. ♥
Cluster Frame TOU
Thank you SO much for being so interested in my cluster frames. I love that you enjoy using them.
However I do have a request, please do NOT credit me as the cluster frame on your tags. Although I assembled it, I do not believe I deserve any such credit. If anything, please list Scrapkit by, (assuming you didn't add other bit by a different designer to your tag of course). I'd prefer not be given credit for simply assembling the cluster frame. Thank you ♥
Followers
Sunday, June 13, 2010
• Flyaway scrapkit made by the talented Bastelgalaxy, check her blog here for places it's sold at.
• I used 2 tubes I had purchased at Barb Jensen's site. Please do not use this artist's work without a proper license to do so.
• Template 352 I used was by Missy, please go to her blog to get it. Thank you so much Missy!
• I used a mask 2 from Melissa, please check out the masks there, they are awesome!
• Now anyone that has done my tuts knows I LOVE filters, and in this one I used: Mura Meisters Cloud, Super Blade Pro (coconut ice setting), Eye Candy 4000 Glass, Eye Candy 4000 Gradient Glow, Eye Candy 5 Perspective Shadow, and Xero Porcelain.
• Font used was P22 Oh Ley which I cannot share, but any font of your choice will work nicely.
Okay ready, let's go tag something purdy!
• Open up Missy's fabulous template, duplicate the original so that you can re-use again later. I changed the canvas size to 750 x 650 so we've got lots of room to work. Unhide the bottom background and flood fill white again. Delete the credits layer labeled by Missy. As her templates are already in 72 dpi no need to change that even if using PTU tubes woohooo! Okay let's get started!
• On Rectangle layer, select all, float, defloat, invert selections and paste paper of choice as a new layer (I used paper 28) and I re-sized the layer by about 85% and when happy with how it looks, press delete and select none. Delete the original Rectangle layer.
• On Glittered Circle layer, I changed the white color to a dark green color in the kit by using the manual color correction tool. Choosing a lighter color as the source and then on the target you want to have it the color you want it to end in, I chose code of #229e97, but use whatever your preference is for the tag you are making.
• On Large Circle layer, select all, float, defloat, add a new layer and on that new layer paste paper of choice into selection. I used paper 32 and then select none and delete the original Large Circle layer. Do the same with the Med Circle layer, this time I used paper 31. Complete these steps again on the Small Circle layer and that time I used paper 2.
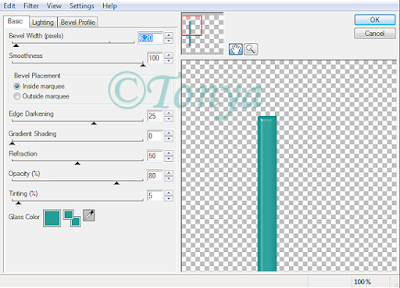
• On Thin Rectangle 1 layer, change the color to a coordinating color in the tag. I changed the pink color to a teal color (code #229e97 again) just like before. I then applied Eye Candy 4000 Glass to this layer with the settings posted below. Do the same steps with Rectangle 2, 3, and 4 with the differing colors on 3 & 4. See my tag for reference.

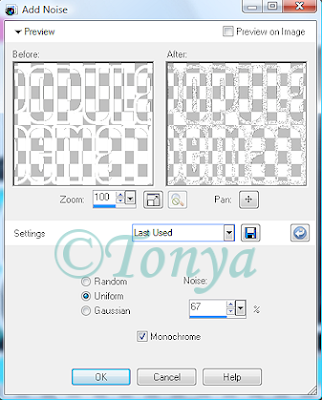
• The wordart piece, you can colorize these nicely to your liking however you want but I use my magic wand to select as I go. So with your magic wand, I had mine at tolerance about 25 and feather of 0 and selected all of the black text and one exclamation point, once all are selected, I applied Super Blade Pro (coconut ice setting). I found it wasn't as shiny as I wanted so I applied Eye Candy 4000 Glass also with the same settings as above however changed the teal color to be black. You may need to play around with the 3rd tab (bevel profile) settings, use whatever you think works best. Select none. On the pink exclamation point, I used manual color correction to change the pink color to a teal color and also applied Super Blade Pro to that item. With the word "BY" I changed the pink color to a teal color, applied a nice inner bevel setting. Finally on the aqua colored hearts, I changed the color again with manual color correction tool from the aqua (source) to purple (target) and with them still selected, applied Super Blade Pro (once again with the coconut ice setting). Select none and finally, I selected the the white gradient glow that is around all of the text. Once all selected, I applied noise with the following settings:

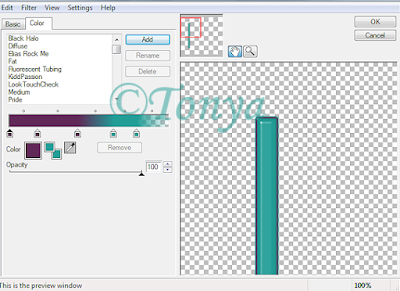
• Okay now let's put some gradient glow around some of the edges. I applied gradient glow to all my teal layers one like this one posted below. Settings on first tab were 4, 25, 100. Use whatever works best for your tag though. Then on the purple layers, I basically reversed the colors on the gradient glow.

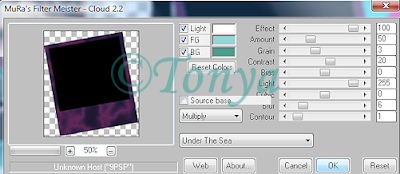
• Okay we gotta do something with those photo frames yet. On the polaroid on left, I used magic wand to select the white portion and then changed the color to a nice purple color using the manual color correction tool. With everything selected yet, I applied Mura Meisters Cloud with the following settings:
Select none if happy and then do the same with the other polaroid frame doing teal instead of purple. See my tag for reference. Now time to place our tubes in there of course. Using magic wand tool select inside part, invert selections and contract by 1. I do this because when we erase parts of the tube layer, it looks more seamless that way. Paste tube as new layer and arrange to your liking, re-size if necessary. Once happy with placing, grab your eraser tool and erase the bits that hang over on the bottom. Select none, duplicate tube and apply gaussian blur of 5 and change blend mode to soft light. On the bottom tube apply Xero Porcelain with the default settings. Repeat these steps on the other frame.
• Re-size your image to what you want your ending tag to be and add any elements of choice and re-sizing and positioning as you like. If you are using same kit I did there are LOADS of fabulous elements in there. At this point I also applied my drop shadows using Eye Candy 5 Perspective Shadow but if you don't have that filter, the drop shadow feature in PSP works just great as well. On the background layer, add a new layer. In your material palette create a gradient from your 2 main colors of the tag and flood fill on that new blank layer and apply Melissa's mask, merge layer group. I used my deform tool to stretch it just a little.
• Add the artist's copyright and your tagger's watermark to the tag and then of course your text. I used P22 Oh Ley but if you don't have that font, just use your fave scripty font of choice. Hide white background layer and save as a png and voila you're all done! I hope you've enjoyed my tutorial.

This tutorial was written by Tonya on June 13, 2010 and absolutely no part of this tutorial may be taken or used without my express permission. Any similarities to any other tutorial is purely coincidental.
Labels:Barbara Jensen,PTU Tutorials
Subscribe to:
Post Comments
(Atom)
Labels
- CDO (1346)
- Wallpapers (756)
- Timeline Set (395)
- CDO Bonus Tube (264)
- Dees'Sign Depot (231)
- Ladyhawwk Designs (226)
- Verymany (174)
- Tasha's Playground (138)
- Chichi Designz (135)
- CDO CT (130)
- Barbara Jensen (126)
- Foxys Designz (126)
- FTU Cluster Frames (120)
- Snag Sets (118)
- Hungry Hill (117)
- Honored Scraps (107)
- Rebel Dezigns (106)
- CDO Scrap CT (87)
- Gimptastic Scraps (82)
- Animated (72)
- Karmalized Scraps (72)
- Rebecca Sinz (62)
- Gothic Inspirations (56)
- Freebie (55)
- Chaos Priestess (54)
- CDO Scrapkit Bundles (52)
- Kissing Kate (46)
- Rieneke Designs (43)
- PTU Tutorials (42)
- Gradients (36)
- PTU Clusters (34)
- Zindy Nielsen (32)
- Templates (29)
- A Space Between (25)
- CDO Retired Bonus (25)
- Mystical Scraps (24)
- Creative Scraps by Crys (23)
- FTU Tutorials (22)
- CDO Collab Kits (20)
- Keith Garvey (20)
- Masks (20)
- Kizzed by Kelz (19)
- CDO Diamond Club (17)
- Forum Set (15)
- Scrappin' Krazy Designs (12)
- Doodle by Design (11)
- Schnegge Scraps (11)
- Special Note (11)
- AoRK (10)
- Birthstone Series (10)
- Monti's Scraps (10)
- Christmas (9)
- Treasured Scraps (9)
- No Scraps Tutorials (8)
- Whisprd Dreamz (8)
- Zlata M (8)
- CDO Scrap Collab (7)
- Digital Art Heaven (7)
- Pink Paradox Productions (7)
- CT Collabs (6)
- Dark Yarrow (6)
- Sophisticat Simone (6)
- TK Dezigns (6)
- Layouts (5)
- Textures (5)
- CDO Exclusive Tube (4)
- Creative Misfits (4)
- Irish Princess Designs (4)
- LML Designs (4)
- Curious Creative Dreams (3)
- Dance in the Rain (3)
- Freeks Creations (3)
- Raspberry Road (3)
- Awards (2)
- CDO Cluster Packs (2)
- Mellie's Beans (2)
- Scrapkits (2)
- Thank You! (2)
- Wicked Princess Scraps (2)
- sylly creationz (2)
- 'how to' tutorials (1)
- Blinkies (1)
- CDO Animation Collab (1)
- TOU (1)
Leave Some Lovin'
Search This Blog
Blog Archive
-
►
2020
(187)
- ► November 2020 (19)
- ► October 2020 (17)
- ► September 2020 (26)
- ► August 2020 (19)
- ► April 2020 (14)
- ► March 2020 (22)
- ► February 2020 (18)
- ► January 2020 (15)
-
►
2019
(178)
- ► December 2019 (17)
- ► November 2019 (20)
- ► October 2019 (10)
- ► September 2019 (15)
- ► August 2019 (8)
- ► April 2019 (18)
- ► March 2019 (16)
- ► February 2019 (13)
- ► January 2019 (18)
-
►
2018
(263)
- ► December 2018 (16)
- ► November 2018 (27)
- ► October 2018 (22)
- ► September 2018 (17)
- ► August 2018 (19)
- ► April 2018 (23)
- ► March 2018 (28)
- ► February 2018 (21)
- ► January 2018 (24)
-
►
2017
(253)
- ► December 2017 (11)
- ► November 2017 (16)
- ► October 2017 (23)
- ► September 2017 (15)
- ► August 2017 (22)
- ► April 2017 (28)
- ► March 2017 (21)
- ► February 2017 (33)
- ► January 2017 (25)
-
►
2016
(342)
- ► December 2016 (28)
- ► November 2016 (27)
- ► October 2016 (30)
- ► September 2016 (23)
- ► August 2016 (25)
- ► April 2016 (31)
- ► March 2016 (27)
- ► February 2016 (32)
- ► January 2016 (29)
-
►
2015
(362)
- ► December 2015 (35)
- ► November 2015 (43)
- ► October 2015 (29)
- ► September 2015 (27)
- ► August 2015 (34)
- ► April 2015 (31)
- ► March 2015 (31)
- ► February 2015 (22)
- ► January 2015 (25)
-
►
2014
(150)
- ► December 2014 (18)
- ► November 2014 (20)
- ► October 2014 (14)
- ► September 2014 (10)
- ► August 2014 (11)
- ► April 2014 (12)
- ► March 2014 (13)
- ► February 2014 (14)
- ► January 2014 (8)
-
►
2013
(37)
- ► December 2013 (3)
- ► November 2013 (6)
- ► October 2013 (3)
- ► September 2013 (2)
- ► August 2013 (4)
- ► April 2013 (1)
- ► February 2013 (2)
- ► January 2013 (4)
-
►
2012
(8)
- ► December 2012 (2)
- ► October 2012 (1)
- ► March 2012 (1)
- ► February 2012 (2)
- ► January 2012 (1)
-
►
2011
(20)
- ► December 2011 (4)
- ► November 2011 (2)
- ► April 2011 (1)
- ► March 2011 (3)
- ► February 2011 (2)
- ► January 2011 (3)
-
▼
2010
(42)
- ► November 2010 (1)
- ► October 2010 (1)
- ► September 2010 (5)
- ► August 2010 (2)
- ► April 2010 (3)
- ► March 2010 (4)
- ► February 2010 (5)
- ► January 2010 (16)
-
►
2009
(23)
- ► December 2009 (8)
- ► November 2009 (4)
- ► October 2009 (11)


0 comments:
Post a Comment