About Me

- Tonya
- Hiya I'm Tonya! I'm an avid psper, have been for a few years and finally have me a blog that I've been working on slowly getting stuff added to. I started writing tuts and recently started making masks and templates. I LOVE to see creations you've made with my things, if you'd like to email me please do so at aquaspinner@gmail.com ................................................. My TOU are as follows: All of my items are personal use only NO Commercial Use, please do not share (distribute) my stuff in groups, just send people here to grab please. ♥ Tutorial writers, if you wish to use my stuff in your tutorials, of course I am honored! You're more than welcome to use my stuff in them, I only require that you link to me and send people here to grab the goodies that you are using in the tut. ................................................. Hope you'll enjoy what I have for ya and thanks for stopping by. ♥
My Artist CTs ♥

My CTs ♥


My Guest CTs ♥


Tuesday, September 28, 2010
Okay this is NOT a tag tutorial. Many people have asked me to tut how I use Super Blade Pro in the text of my tags cuz it usually looks pretty shiny lol so I'm going to give this a whirl! I'll just use example on making text cuz it's eay. First things first gotta have the filter! You can get it at Flaming Pear the makers of the filter. It does come with I think its a 30 day free trial and then you do have to purchase it. It's one of those filters that I definitely think is worth the money lol.
Okay so you've got the filter and you just install it like any other filter. Never ever install filters directly to your PSP Program Files. I always put all my 'psp stuff' on my external hard drive. I created a folder called My PSP Files and then a subfolder for Plugins and then of course each filter has a folder in there including my Super Blade Pro. Now when you download you should see your 8bf folder and also you'll see a folder called environments and textures and also one for images. Important stuff for later.
Next thing you wanna do is have some presets added in. SBP does come with some generic presets and those are fine but there are some that are in my opinion BETTER lol! Here's a couple of links to some awesome presets. When you download presets, you need to put them in the environments and textures folder. The program will not work if you don't! Okay here's some links and these are free presets and who doesn't love free???
http://www.meadowsstudio.com/ has freakin' awesome ones especially the coconut ice one which I use A LOT, the other ones are really cool too
http://www.essexgirl.uk.com/sbp_presets-index.htm another really great one, sorted by color and if you're a hoarder like me you'll love these haha
another set I love but don't know about the sharing rules on them so unfortunately I cannot share are the 'kris' ones. But the above two will get you started!
Okay so I've opened up a new canvas, add a new layer for your text and I'm choosing a nice fat scripty font called Applejuiced. Sometimes the thinner fonts don't tend to work that great with the super blade pro effect. Typing out my name nice n big and some of the effects I find works best using white text, which is what I'm going to do for this example and using one of the Meadow Studios ones, called Blue Patriotic cuz well I feel blue today lol.
At this point you should see basically just marching ants around the name and the white text. I also create my text as floating. If you are a vector creating text PSPer, convert to raster layer, select all, float and defloat. You must have marching ants around the text for the plugin to work appropriately. Now we want to use the plugin yahoooooo. Go to Effects and find Flaming Pear and then Super Blade Pro you should get the following screen:
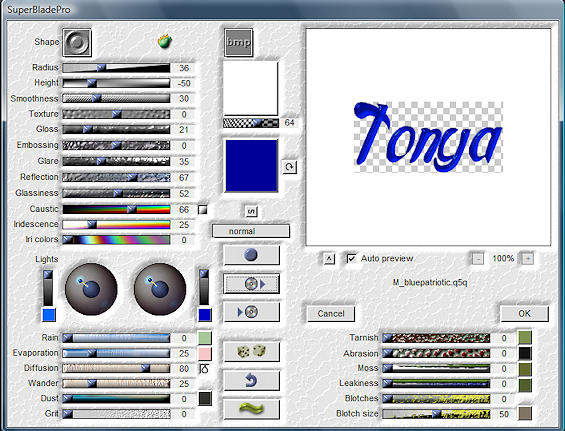
Now let's talk about this screen lol. You'll see the name of the preset I'm using M_bluepatriotic. Basically it remembers the last one used and often shows you a preview of what your selection will look like. If you're using the same as previously just click okay but if you want to change it, you need to click on the red box in next example:

Clicking that box opens up all your preset choices. Me I have a LOT of presets. I fully admit to being a preset ho! You can generally see a preview in there as well as you're flipping through them. Some people tend to sort theirs by color. I don't do that mostly cuz I'm too darned lazy to go in and do so lol. The box underneath the one I selected is to save a preset if you've made one. I've never done that nor have I changed any of the settings on the presets. It's easier to colorize if need be later. Now sometimes you want to look at different bevels, you can do that by clicking on the 'shape' in the upper left area there. You'll see there are about a dozen or so different options. On the one I have selected it's using the second from bottom shape, but you'll see what clicking different ones does to the previews as you try them. For example the very bottom one pretty much takes out the bevel. Not one I use most times! When happy just click okay that's all there is to it! The other buttons in there I don't really touch ever.
Now some tips/observations if you like to hear em. You can do this filter not just with text but also with perhaps elements in the templates you use to make tags or sometimes even wordart works good with the effect too.
If you haven't used the preset before it may ask you to find a particular file, the image file associated with the preset. It should be within that same folder, or possibly in the images folder, but generally I put everything in the environment and textures folder easy peasy to find then.
Sometimes the color doesn't come out just right. 2 ways to handle this, either change the color you used when you created your text, or after you've applied the preset you can use either the colorize option or the manual color correction tool. Play around with different colors and stuff you'll have a lot of fun with the turnout effect.
After I'm done applying the filter I just select none and often apply a gradient glow and a drop shadow. Sometimes I also use EC 4000 Glass after the SBP effect to make it super glassy lol. It's all style points and how you want to create your text, just have fun with it!
This tutorial was written by Tonya on September 28, 2010. This is my own how to and any similarity to any other is completely unintentional. Please do not copy, rip apart, or re-distribute my tutorial in any way without my express permission.
Okay so you've got the filter and you just install it like any other filter. Never ever install filters directly to your PSP Program Files. I always put all my 'psp stuff' on my external hard drive. I created a folder called My PSP Files and then a subfolder for Plugins and then of course each filter has a folder in there including my Super Blade Pro. Now when you download you should see your 8bf folder and also you'll see a folder called environments and textures and also one for images. Important stuff for later.
Next thing you wanna do is have some presets added in. SBP does come with some generic presets and those are fine but there are some that are in my opinion BETTER lol! Here's a couple of links to some awesome presets. When you download presets, you need to put them in the environments and textures folder. The program will not work if you don't! Okay here's some links and these are free presets and who doesn't love free???
http://www.meadowsstudio.com/ has freakin' awesome ones especially the coconut ice one which I use A LOT, the other ones are really cool too
http://www.essexgirl.uk.com/sbp_presets-index.htm another really great one, sorted by color and if you're a hoarder like me you'll love these haha
another set I love but don't know about the sharing rules on them so unfortunately I cannot share are the 'kris' ones. But the above two will get you started!
Okay so I've opened up a new canvas, add a new layer for your text and I'm choosing a nice fat scripty font called Applejuiced. Sometimes the thinner fonts don't tend to work that great with the super blade pro effect. Typing out my name nice n big and some of the effects I find works best using white text, which is what I'm going to do for this example and using one of the Meadow Studios ones, called Blue Patriotic cuz well I feel blue today lol.
At this point you should see basically just marching ants around the name and the white text. I also create my text as floating. If you are a vector creating text PSPer, convert to raster layer, select all, float and defloat. You must have marching ants around the text for the plugin to work appropriately. Now we want to use the plugin yahoooooo. Go to Effects and find Flaming Pear and then Super Blade Pro you should get the following screen:
Now let's talk about this screen lol. You'll see the name of the preset I'm using M_bluepatriotic. Basically it remembers the last one used and often shows you a preview of what your selection will look like. If you're using the same as previously just click okay but if you want to change it, you need to click on the red box in next example:
Clicking that box opens up all your preset choices. Me I have a LOT of presets. I fully admit to being a preset ho! You can generally see a preview in there as well as you're flipping through them. Some people tend to sort theirs by color. I don't do that mostly cuz I'm too darned lazy to go in and do so lol. The box underneath the one I selected is to save a preset if you've made one. I've never done that nor have I changed any of the settings on the presets. It's easier to colorize if need be later. Now sometimes you want to look at different bevels, you can do that by clicking on the 'shape' in the upper left area there. You'll see there are about a dozen or so different options. On the one I have selected it's using the second from bottom shape, but you'll see what clicking different ones does to the previews as you try them. For example the very bottom one pretty much takes out the bevel. Not one I use most times! When happy just click okay that's all there is to it! The other buttons in there I don't really touch ever.
Now some tips/observations if you like to hear em. You can do this filter not just with text but also with perhaps elements in the templates you use to make tags or sometimes even wordart works good with the effect too.
If you haven't used the preset before it may ask you to find a particular file, the image file associated with the preset. It should be within that same folder, or possibly in the images folder, but generally I put everything in the environment and textures folder easy peasy to find then.
Sometimes the color doesn't come out just right. 2 ways to handle this, either change the color you used when you created your text, or after you've applied the preset you can use either the colorize option or the manual color correction tool. Play around with different colors and stuff you'll have a lot of fun with the turnout effect.
After I'm done applying the filter I just select none and often apply a gradient glow and a drop shadow. Sometimes I also use EC 4000 Glass after the SBP effect to make it super glassy lol. It's all style points and how you want to create your text, just have fun with it!
This tutorial was written by Tonya on September 28, 2010. This is my own how to and any similarity to any other is completely unintentional. Please do not copy, rip apart, or re-distribute my tutorial in any way without my express permission.
Subscribe to:
Post Comments
(Atom)
Grab My Blinkie

Awesome tut Tonya, thank you so much!!
ReplyDeleteI was missing the float/defloat part, amazing tut agin honey, thank you!!=]
wow it worked thanks Tonya
ReplyDeleteThank you so much for posting this information!!!! It has been a huge help in figuring out how to use flaming pear. Thank you!
ReplyDeleteWould You All Know Where I could Get Corners made from Superblade pro Psds Thank you
ReplyDelete